music in video is from demo 2008 by (Latch\xe9 Swing) / CC BY-NC-SA 2.0
[Editors Note: I know I spelled Kitchener stitch wrong on the video. I’ll fix it as soon as I have a chance]
This stitch was requested by Fiona R. on our Facebook Page!
To request your own stitch Click Here!
The Kitchener Stitch is a bind off method that is used to join to sets of live stitches. It is often used when finishing a sock.
Also known as: Graft stitch, Weaver Stitch.
Skill: Advanced
Pattern:
Step 1: Divide your stitches evenly between your two needles. Your needles should be parallel with both tips facing the same direction and the last stitch worked should be at the tip of the back needle.
Step 2: Cut your working yarn, leaving a two foot tail, and thread the yarn through a tapestry or darning needle.
Step 3: Insert the tapestry needle into the first stitch on the front needle purlwise and pull the yarn through. Leave the stitch on the needle.
Step 4: Insert the tapestry needle into the first stitch on the back needle knitwise and pull the yarn through. Leave the stitch on the needle.
Step 5: Insert the tapestry needle into the first stitch on the front needle again. This time knitwise, and pull the yarn through, dropping the stitch from the needles.
Step 6: Insert the tapestry needle through the next stitch on the front needle purlwise. Leave the stitch on the needle.
Step 7: Insert the tapestry needle into the first stitch on the back needle again, purlwise, and pull the yarn through, dropping the stitch as you go.
Step 8: Insert the tapestry needle through the next stitch on the back needle knitwise and pull the yarn through. Leave the stitch on the needle.
Repeat steps 5-8 until you have two stitches left, one on each needle. Then finish the last two stitches by repeating steps 5-7.
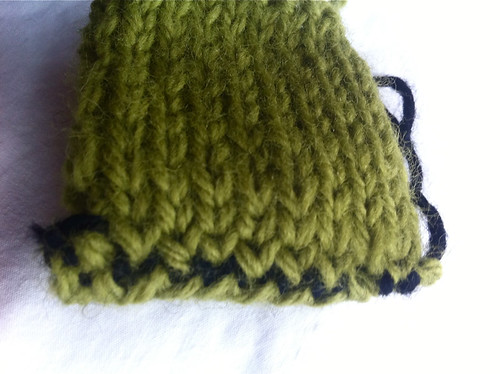
Here is an example of this method on a sockinette stitch swatch:
I just finished my Sidewinder Hat. Ihad it all but the grafting and finally got to it. I couldn’t have done it without your great tutorial. I have always been afraid of it and bungled it so badly in the past I gave up trying. Now I have done it, it’s not so bad. Thank you for being there for me once again.